How to make a sign-up sheet in about a minute
Last updated August 31, 2026
Somebody has to make the sheet, and that is usually the part that stalls: an account, a template gallery, a form to design, a spreadsheet of responses to go and read later. On anonylist a sign-up sheet is a list, the list is a link, and the link exists the second you open it. This guide is the whole build — five steps, four of them typing — and then what the people you send it to actually do.
Opens instantly. No account, no email.
What you need first
Nothing installed, and no list of who’s coming. You do want two decisions made before you start typing, because they’re the only things the app can’t guess: how the sheet splits up (by day, by shift, by course, by classroom) and what each need is called. “Booth, 12–2pm” is a good need. “Volunteers” is not — one row holds one name, so a need that could take three people is three rows.
Step 1 — open a list and name it
Tap the button above and a list opens, already yours, already live at its own address. It has no name yet, so a single tap on the title puts the caret straight in it: type Booth shifts — Spring Fair and press Enter. The name is what the sheet is called in a text message and in your own list drawer later, so it’s worth the four seconds.
Step 2 — add a section for each day or group
Under the add box are three quiet buttons: + Section, + Note, + Sign-up. Tap + Section and it opens straight into naming — type Saturday, press Enter, and you have a heading with its own progress counter.
One thing to know before you type three of them: a new section lands at the top, the same way a new item does. So either add your days in reverse (Sunday, then Saturday, then Friday) and they come out in order, or add them in the order you think of them and drag them into place afterwards — press and hold anywhere on a section header and its rows travel with it.
Sections are optional. A sheet with six needs and no headings is a perfectly good sheet; the headings start earning their keep at about ten rows, when the counters become how you read the thing.
Step 3 — turn each need into a sign-up row
At the end of every section sit three small links: + Item, + Note, + Sign-up. Tap + Sign-up and a row opens asking “What’s needed?”. Type the need and press Enter — that saves it and opens another sign-up row underneath, so a whole day of shifts is one unbroken run of typing. When you’ve done the last one, tap anywhere else; the empty row you left behind disappears on its own.
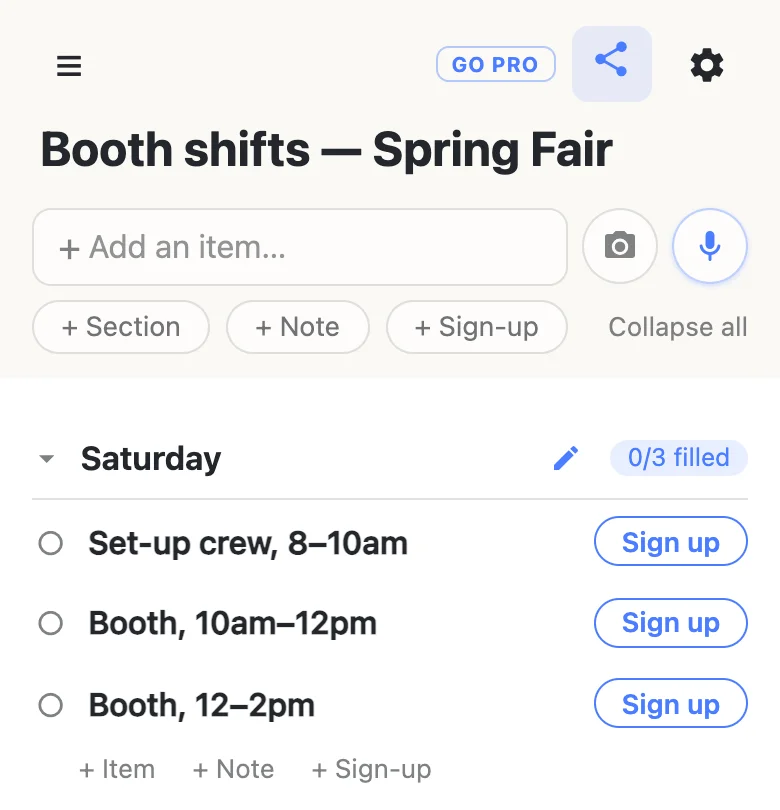
A sign-up row is deliberately not a checkbox. There is nothing to tick, because being filled is its state: an empty circle and a Sign up button while the need is open, a green check and somebody’s name once it isn’t. If you want ordinary to-dos on the same sheet — print the price signs, the jobs nobody signs up for — that’s what + Item is for, and the two live happily in the same section.
Step 4 — put the instructions in a note
Every sheet has a paragraph that doesn’t belong in any row: where the table is, what time the doors open, the nut-free rule. Tap + Note and write it. A note is a block of text rather than a row to claim, it sits wherever you drag it, and putting it at the very top means every person who opens the link reads it before they read the needs — which is the whole reason it beats a sentence in the group chat that scrolled away three days ago.
Step 5 — send the link
Tap the share button in the header. On a phone that opens the usual share sheet, so the sheet goes into a text, a class group, a WhatsApp thread or an email like any other link; on a laptop it copies the address to your clipboard. That is the entire distribution step. Nobody is invited, nobody is added, and there is no “who has access” screen — whoever holds the link can open and fill the sheet, which is exactly what a clipboard by the gym door does, and exactly the tradeoff to think about before you paste it somewhere public.
What the people you send it to do
They tap the link and the sheet opens — no account, no app, no “continue with Google”. The first time, they’re asked what to call themselves; a first name is what most people type, and skipping it hands them a generated one like Quiet Otter rather than blocking them.
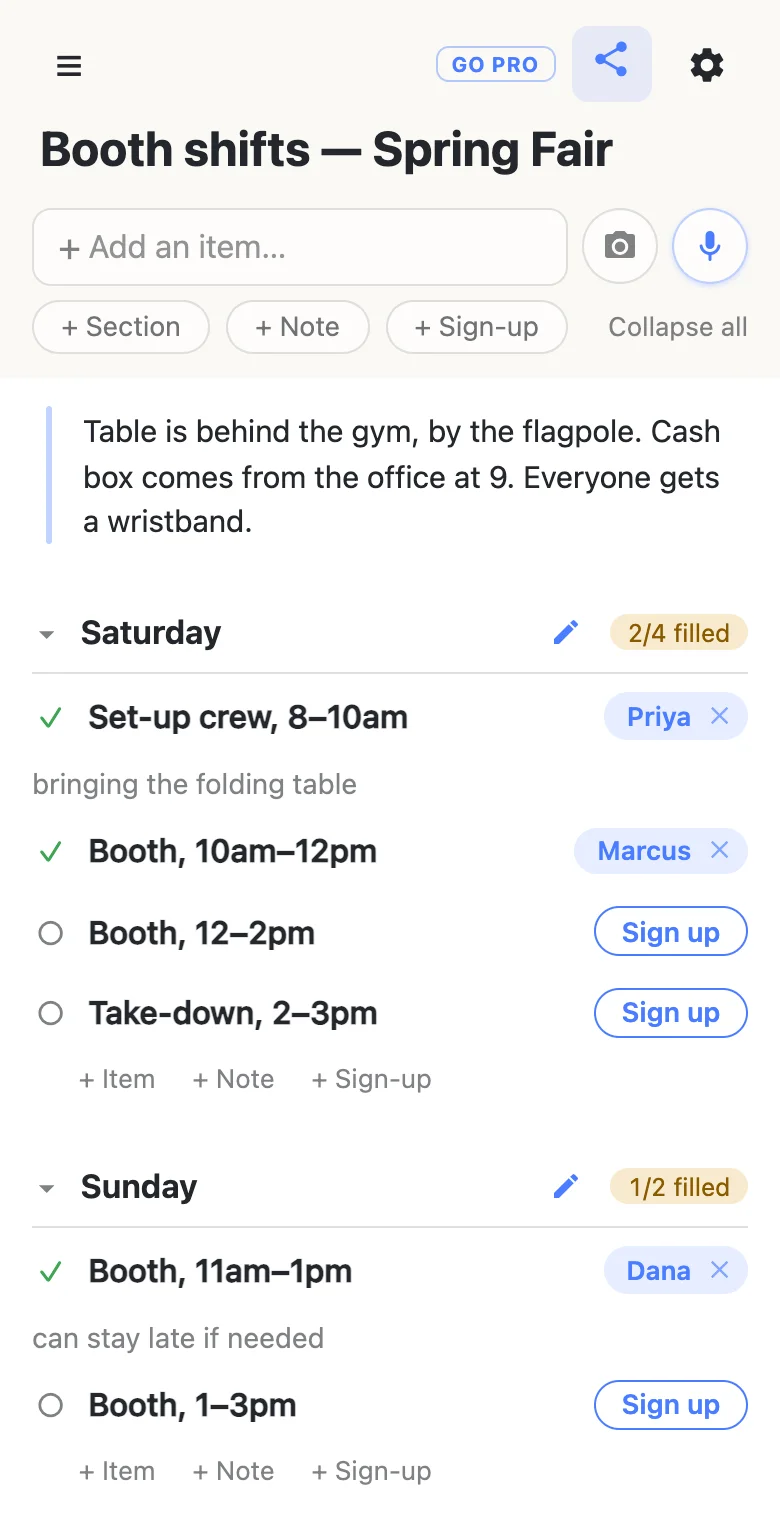
Then they tap Sign up next to the need they’re taking. Their name lands on the row instantly, on everyone’s screen, and a small box opens for the optional detail — bringing the folding table, can stay late if needed. That’s the whole interaction: one tap to commit, one line if they have something to add.
Reading it at a glance
Each section carries a counter — 2/4 filled — and it changes colour as it goes: plain while nobody has signed up, amber while it’s partly covered, green with a check once every need in that section has a name. Collapse the sections you’ve stopped worrying about and the sheet becomes four lines telling you exactly where the gaps are. That collapsing is yours alone, incidentally; tidying your own view never rearranges anybody else’s.
There is nothing to export and nothing to go and check. The sheet is the responses — the same address you sent out on Monday is the coverage report on Friday.
Fixing a sign-up
People sign up spouses, kids and colleagues, so the sheet lets them: tap the name on a row and you can type a different one over it. Tap the × beside a name to clear it — your own goes immediately, and clearing somebody else’s asks you to confirm first, because their note goes with it. Nothing here is locked to the person who typed it, which is the same trust a paper sheet on a noticeboard runs on.
Editing a need itself works like any other row: tap it to select, tap the pencil to type. And if two of you are working on the sheet at once, the row somebody is inside is held while they’re in it, so you can’t overwrite each other mid-sentence.
If the sheet is bigger than your friends
Everything above is the free product, and for a potluck or a team snack rota it’s the whole answer. The moment the link goes somewhere wider — a school newsletter, a church bulletin, a community board — the question changes from “can people sign up” to “can people wreck it”. That’s what anonylist pro is for: a sheet you own, where visitors can claim rows and add their notes but can’t delete anything, plus a readable address to print. The sheet works the same; you just get the say over what everyone else may do to it.
Questions
- How long does it actually take to make a sign-up sheet?
- About a minute for a small one. There is no account step, no template to choose and no settings to fill in — the list exists the moment you open it, so the only typing you do is the needs themselves. A twelve-slot sheet across three days is a couple of minutes, most of it spent deciding the shifts rather than operating the app.
- Do I have to finish the sheet before I send the link?
- No, and it is usually better not to. The link never changes, so you can send it after the first two rows and keep building while people read it — anything you add appears on their screen straight away. There is no publish step and no draft state to come out of.
- How many sign-up rows can one sheet hold?
- A thousand rows in total, counting sign-ups, sections, notes and ordinary checklist items together. A shift rota for a weekend festival is nowhere near it; if you are approaching that number, the sheet is probably two sheets.
- Can I build the whole sheet from my phone?
- Yes — it is designed phone-first. The add box sits under the title, the + Sign-up buttons are thumb-sized, and pressing Enter after each need opens the next row, so a rota is one long stretch of typing without reaching for a menu.
- What if I need two people for the same shift?
- Make it two rows. Each sign-up row holds exactly one name, so “Booth, 12–2pm” twice is how you say you need two people — and the section counter then reads 0/2 filled until both are taken, which is the number you actually want to see.